Import Contacts
Overview
Import Contacts adds many contacts at once from an Excel or CSV file, instead of creating them one at a time. Use it when you already have a list — an export from another system, a conference sign-up sheet, a spreadsheet your team keeps.
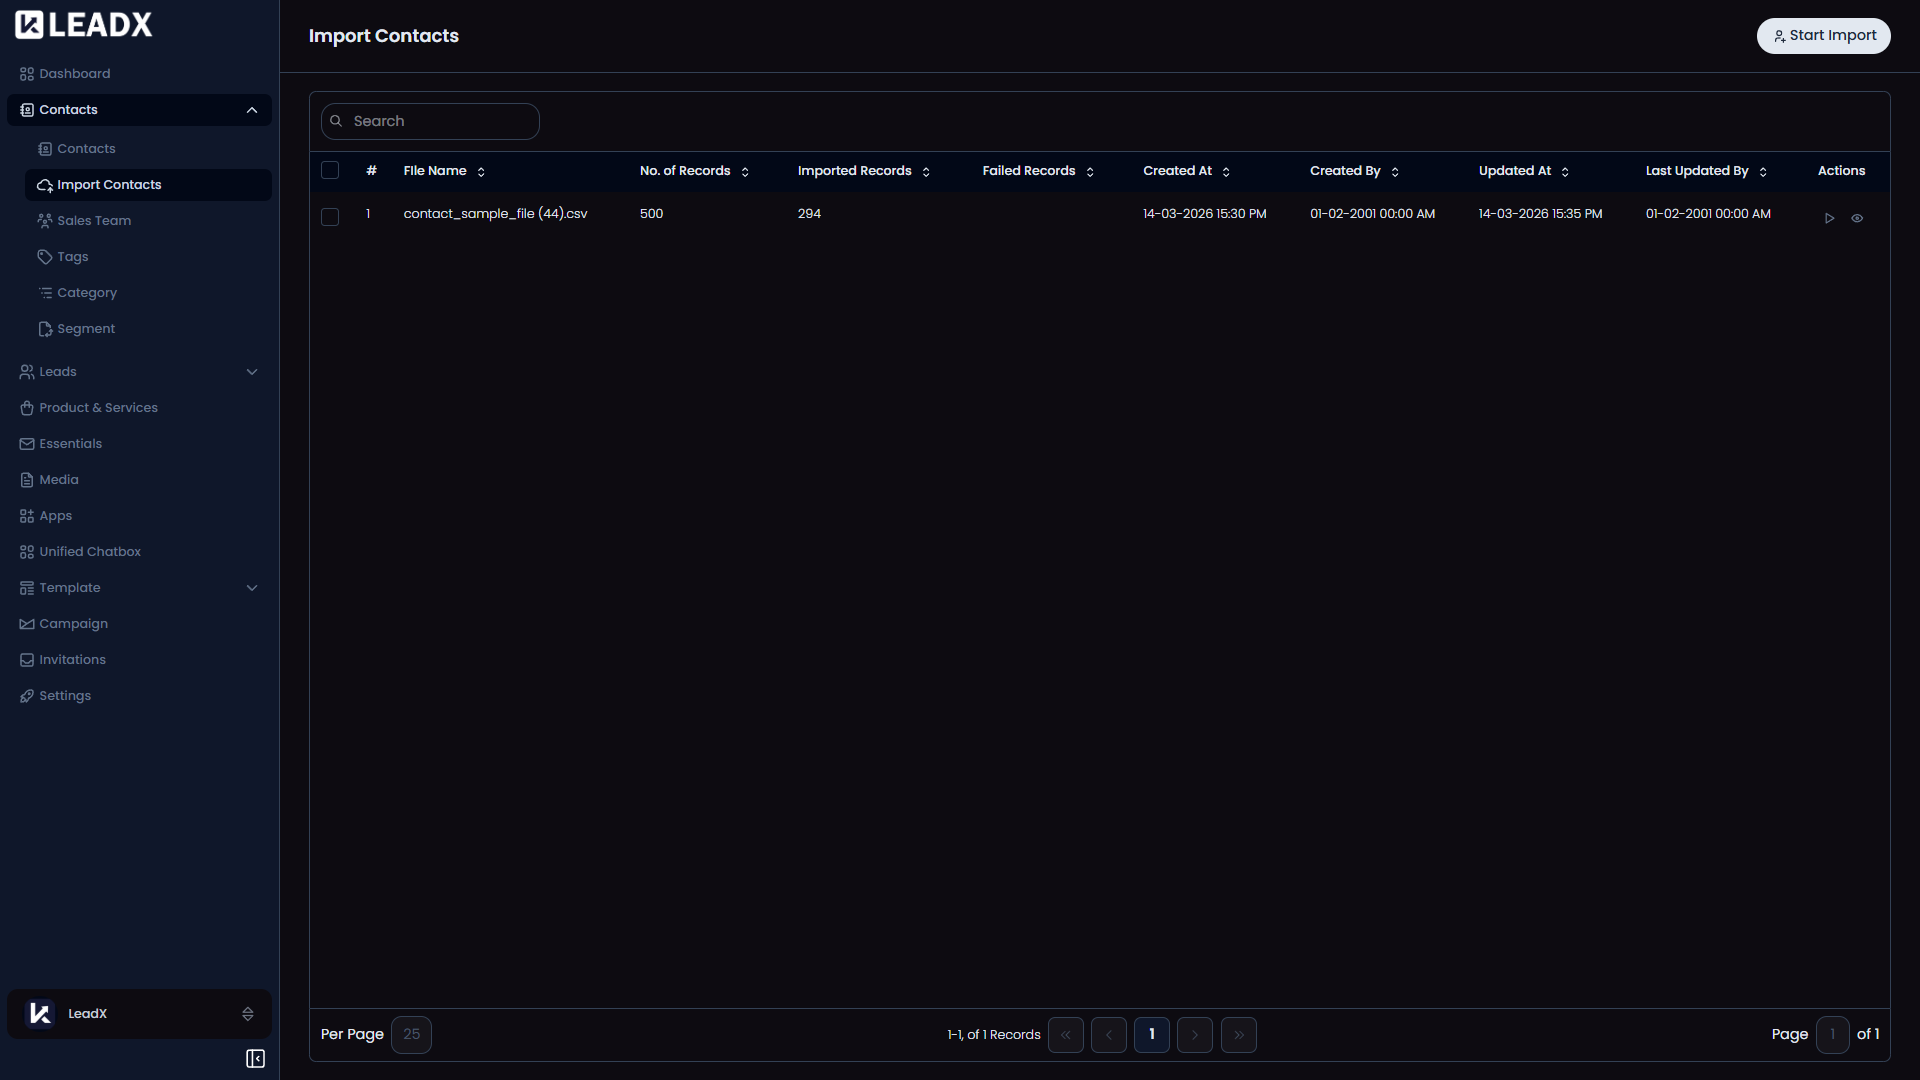
The page itself is a history of your past imports. Each new import is started from here and runs through a four-step wizard.
Access
- Navigation path:
Sidebar > Contacts > Import Contacts - Route:
/import-contacts - Access: available to users who can import contacts.
Prerequisites
- A file in XLSX or CSV format, up to 1 GB.
- If you want to tag or categorise the imported contacts, create those first — see Tags and Categories.
- If you want to map a column that has no matching field in LeadX, you can create one during the import, or set it up in advance under Contact Fields.
The Import List
Before you start, the page shows every previous import with:
| Column | Meaning |
|---|---|
| File Name | The file that was uploaded |
| No. Of Records | How many rows the file contained |
| Imported Records | How many rows were added successfully |
| Failed Records | How many rows could not be imported |
| Created At / Created By | When the import ran, and who ran it |
| Updated At / Last Updated By | When it last changed, and by whom |
Comparing No. Of Records against Imported Records and Failed Records tells you whether an import finished cleanly.
Step 1 — Upload
Click Start Import to begin.
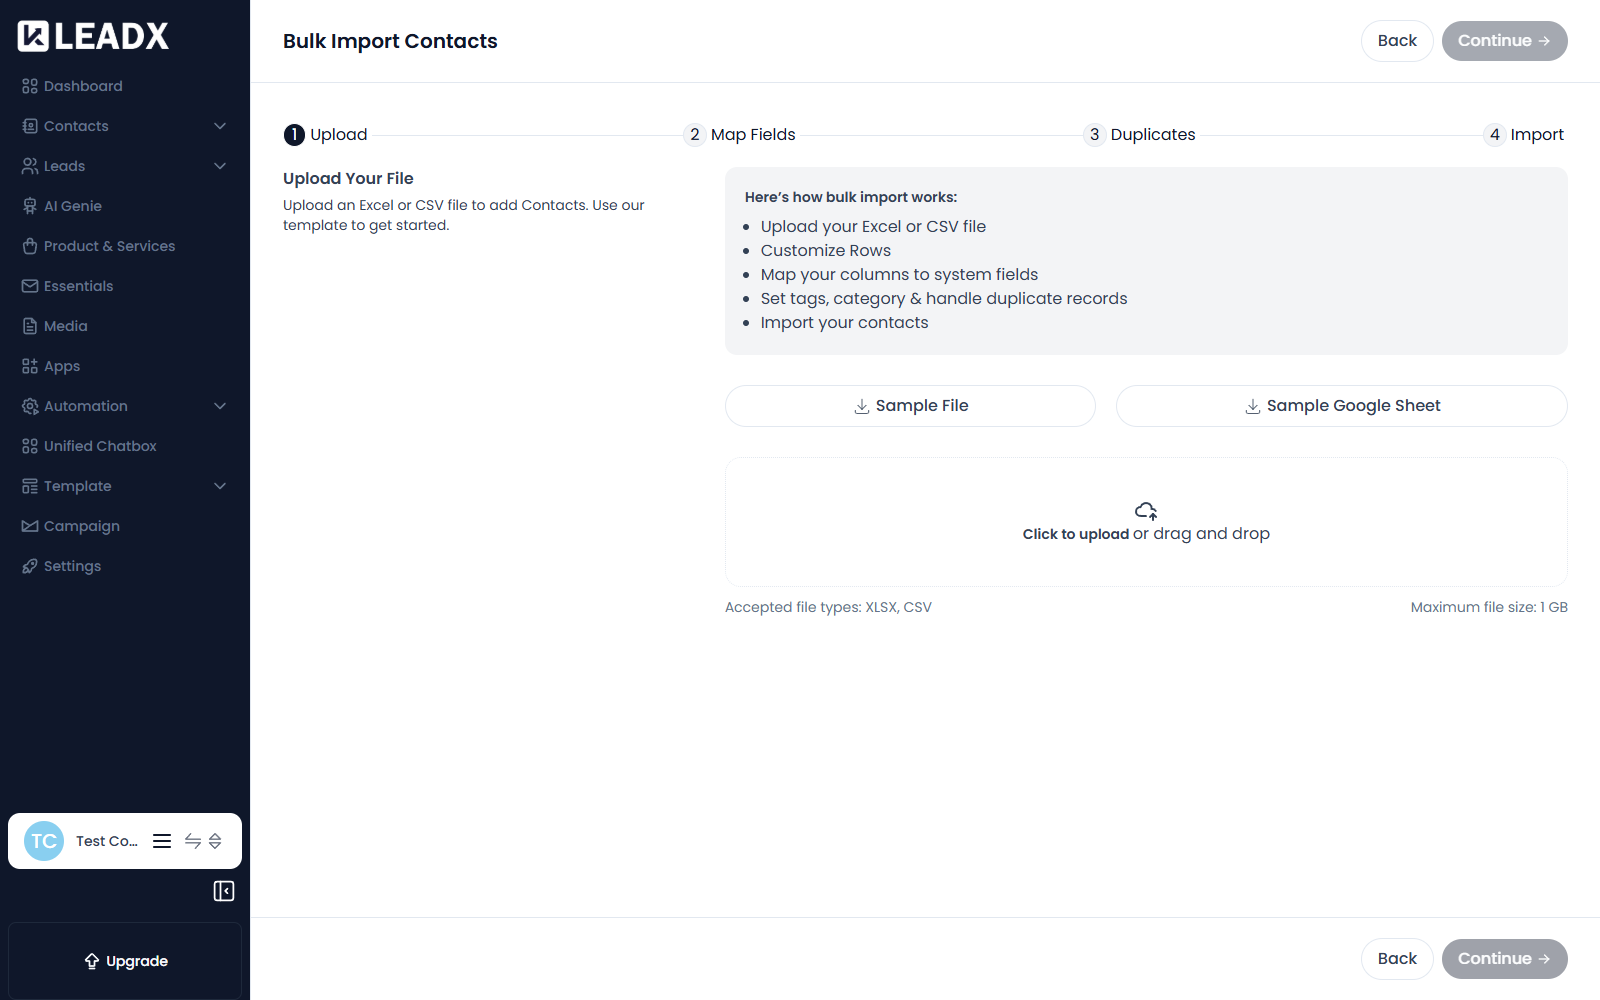
This step is where you provide the file.
- Sample File — downloads a template spreadsheet with the correct column headings. Starting from this is the easiest way to avoid mapping problems later.
- Sample Google Sheet — the same template as a Google Sheet.
- Upload area — click to browse, or drag and drop your file onto it.
Accepted file types: XLSX, CSV Maximum file size: 1 GB
Click Continue when your file is uploaded.
If this is your first import, download the Sample File and paste your data into it. Its column headings already match LeadX's fields, so step 2 maps itself automatically.
Step 2 — Map Fields
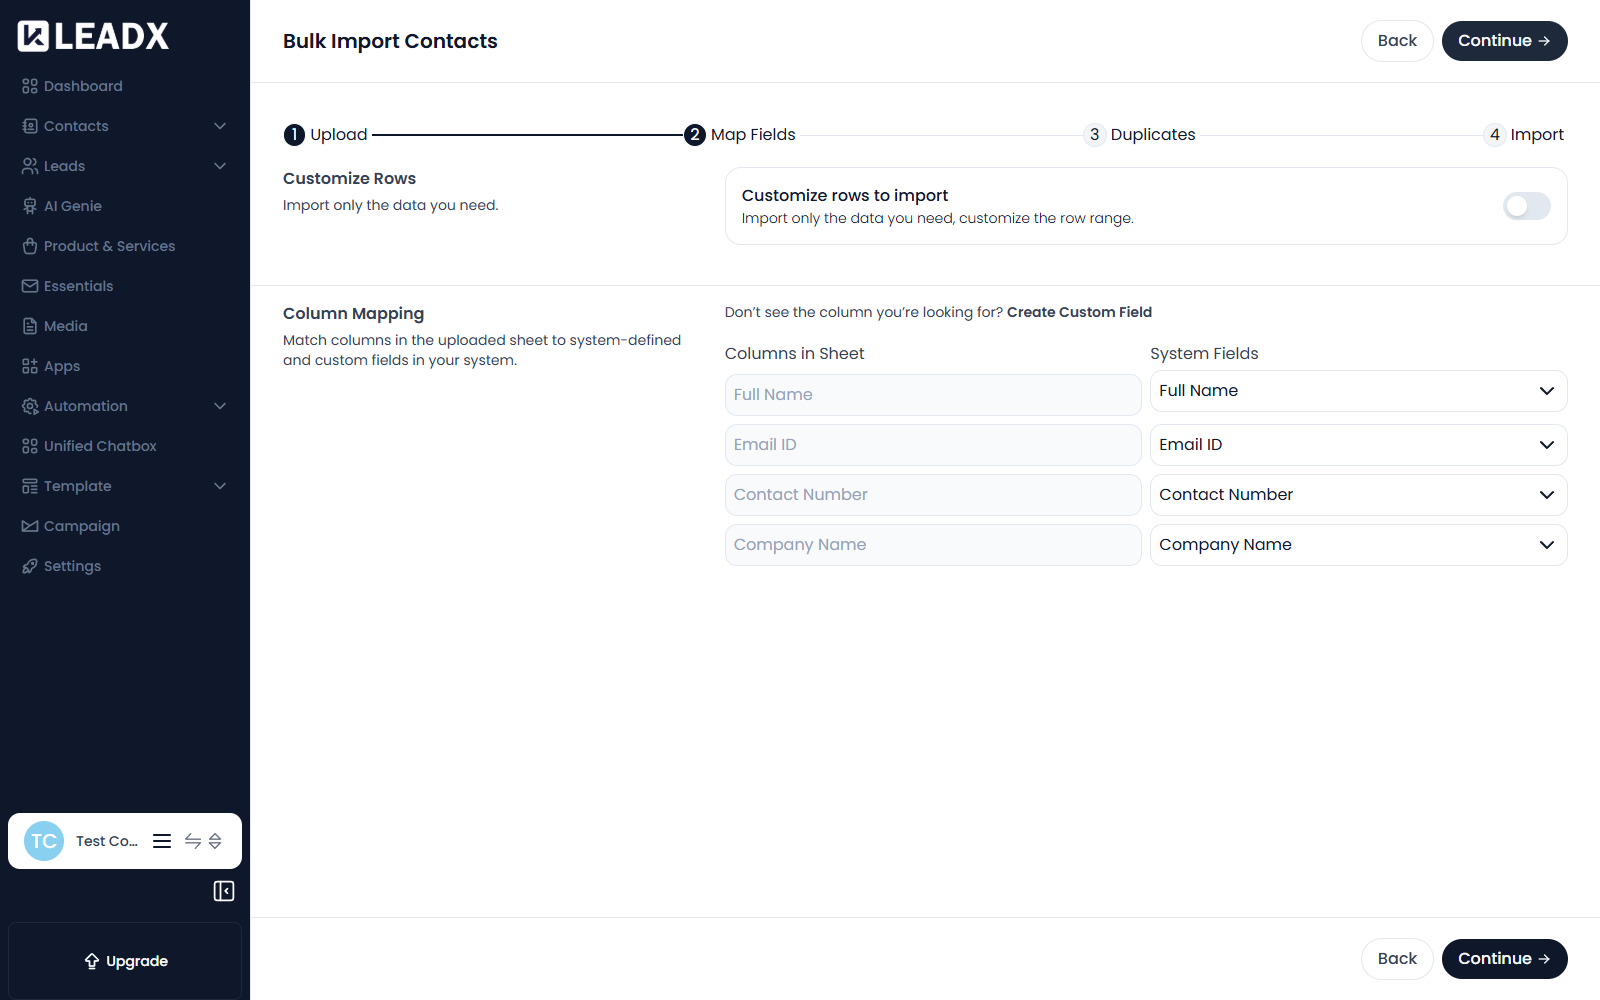
This step tells LeadX what each column in your file means. It has two parts.
Customize Rows
Import only the data you need, customize the row range.
Use this to import only part of the file. If your spreadsheet has notes or totals at the bottom, or you only want the first few hundred rows, narrow the range here rather than editing the file.
Column Mapping
Match columns in the uploaded sheet to system-defined and custom fields in your system.
Each column found in your sheet is listed on the left under Columns in Sheet. Next to it, under System Fields, you choose the LeadX field it should be saved into.
The system fields you can map to include:
- Identity — Full Name, Job Title
- Contact — Work Contact Number, Whatsapp Contact Number
- Company — Company Industry, Company Size, Company Website URL, Company Location, Services
- Address — Street Address, Country, State, City, Postal Code
- Social — Facebook, LinkedIn, Twitter, Instagram, Instagram User ID, Youtube, TikTok, Personal Website URL
- Organisation — Contact Source, Tags, Category
There is also Do Not Import — choose this for any column you want LeadX to ignore, such as internal notes or a row number.
If a column in your file has no matching field, use Create Custom Field ("Don't see the column you're looking for?") to make one without leaving the import.
Click Continue when every column is either mapped or set to Do Not Import.
Step 3 — Duplicates
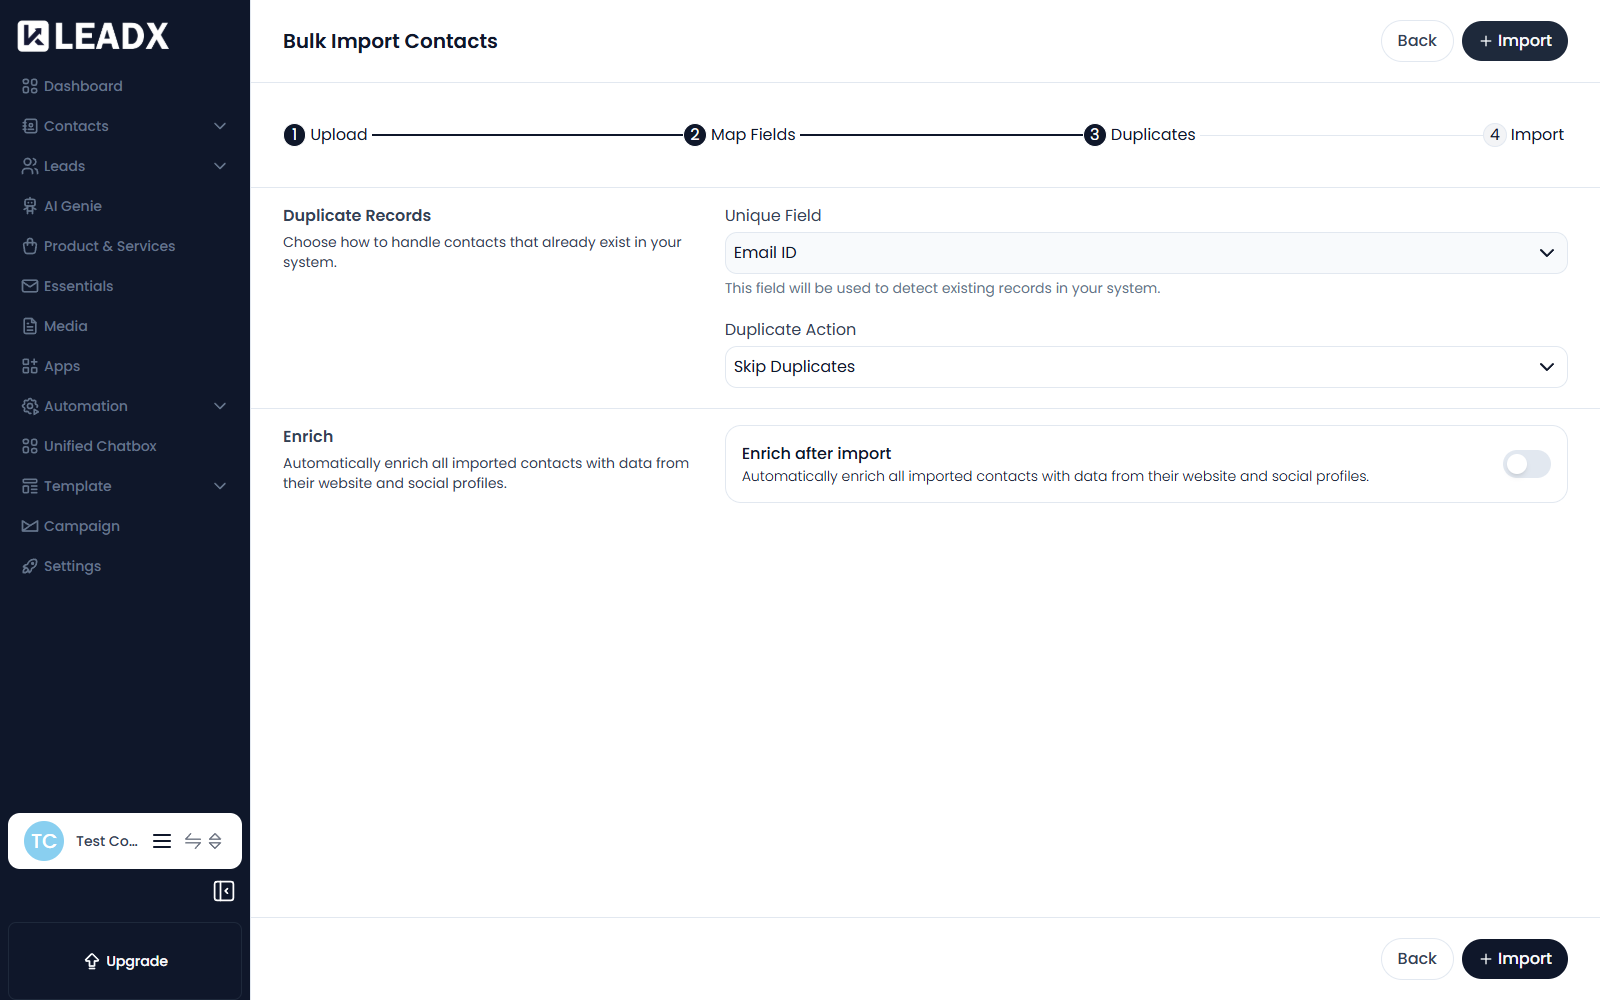
This step decides what happens when a contact in your file already exists in LeadX. This is the step most worth understanding, because it is what can overwrite existing data.
Unique Field
This field will be used to detect existing records in your system.
Choose the field LeadX should match on to decide whether a row is a duplicate — for example Email ID or Contact Number. A row is treated as a duplicate when its value in this field matches an existing contact.
Duplicate Action
What to do with those matches:
| Option | What happens |
|---|---|
Skip Duplicates | Existing records remain unchanged; new duplicates are not imported. |
Replace Entire Record | Existing records are fully overwritten with the new data. |
Add Missing Fields | New fields from the import are added to existing records without altering current data. |
Update Existing Fields | Fields present in the import will update corresponding fields in existing records. |
Replace Entire Record fully overwrites the existing contact, so anything already stored that is not in your file is lost. If you only want to fill in blanks, use Add Missing Fields instead.
Enrich
Automatically enrich all imported contacts with data from their website and social profiles.
Turn on Enrich after import and LeadX will look up each imported contact and fill in extra detail from their website and social profiles, so you get more than the columns your file contained.
Enrichment is a plan feature and consumes credits, so leave it off if you only want exactly what is in your file.
Step 4 — Import
Click Import to run the import.
The import then appears in the list on the main page, where you can watch its Imported Records and Failed Records counts to confirm it finished as expected.
Helpful Notes
- Nothing is created until you click
Importon the final step — you can useBackto revisit earlier steps at any time. - Importing contacts can fire your Workflows. If you have a published workflow triggered by
contact.created, a large import will trigger it for every new contact, which may send real messages. - Failed rows usually mean a required field was empty or a value did not match the expected format. Check the failed count after each import.
- To import opportunities rather than people, use Import Leads instead.